Spray Paint + Stickers = Art!

Thanks to the glories of Pinterest, I came across this amazing pin and linked blog tutorial, and just knew I had to try my hand at it. It also seemed like the perfect Christmas card photo because it’s made by me, doesn’t scream Christmas and would be easy to do. So I got a canvas, stickers, painter’s tape and spray paint and got to work.

Step One: Using the painter’s tape and stickers:

I created the wintery scene:

Step Two: I gave it a coat of spray paint:

The first time I tried it, I was too heavy handed with the spray paint and it turned out awfully, so I was careful to spray from a distance and not overdo it.

Step Three: I let it try then took the stickers off, and ta da:

I scanned it and will get 4X6 photos made at CostCo, stick ’em on some blank white cards and boom, send holiday joy to everyone:

Food for Thought:

-Definitely watch how much spray paint you lay on that thang

-The type of sticker didn’t really end up making a difference in the end product. I had some more glossy ones and some more papery stickers (if that makes sense), and they both ended up working fine

-The actual product looks way better than the scan because it’s kind of a glittery blue spray paint:

Paint + Stickers = Quote Art

I’m a huge fan of quotes and artsy stuff. So when I saw this on Pinterest, I just knew I had to try my hand.

The Paint By Numbers Steps Are:

1. Pick a quote, lay down the stickers

2. Paint over the stickers with water colors.

3. Peel back the stickers to reveal magical art!

Here’s my first attempt/result:

It seriously took maybe five minutes. The most arduous part of this project was pulling apart this old frame so I could put the art inside of it.

I was just itching to make some more pieces of fantastic art, and my parents just happened to celebrate their 27th wedding anniversary on Nov. 10. While I was searching the internets for inspiration, this song came on and boom, their present was born.

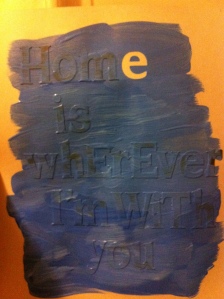
Step One: Lay down the quote with stickers – I used another piece of paper to kind of eyeball it. Only after I got to the end did I realize that I didn’t have enough lowercase es. All I do is win. To make do, I peeled off the e and put it where it was needed. Not ideal, but life is hard when you’re slow. I wasn’t entirely pleased with how it looked, so I found some more stickers and tried again. Then I had the genius idea to include the year they got married:

Step Two: Paint Over the Stickers –

I opted for acrylic paint over watercolor so I used my favorite palette to make a blue I knew my mama would just love:

Then I began painting:

I couldn’t wait for the paint to dry so I whipped out my hair dryer.

Step Three: Peel Stickers Off –

For the one on the right, I peeled off the stickers then blew dry and for the one on the left, I blew dry and then peeled. Blew dry is awkward.

I decided I liked the second one better (with help from my roommate), and I plopped it in the $5 frame I got at Michaels and boom:

I almost texted my mom a picture of it because I’m just so excited. But then I realized I’d see her in a week.

Food for Thought:

-I want to experment with the different kinds of stickers. The bigger ones were thicker and the ones that worked best were the ones I used to write ESTB. 1984.

-Next time, I think I would glob on less paint and hopefully it won’t get under the stickers though there’s something to be said for something that’s not entirely perfect.

The end!